Author Topic: 3d Terrain Project  (Read 5971 times)

boeduur

  • Recruit
  • *
  • Posts: 18
  • Death before dishonor.
3d Terrain Project
« on: 09 May 2017, 15:46:37 »
Hey all,

Since I'm getting back into the game, I've been looking for a space/place to play. But after a couple weeks of searching I decided I needed to get a gaming surface for home because my area doesn't have a big enough community to have Battletech scale terrain at a FLGS. I also wanted a gaming surface that wasn't just 2d hex maps, because I'm jumping back in with Alpha Strike, which feels to me limited by hexes. Most commercially available boards are too expensive for me (just bought a house  :-\ ), even if they weren't custom. And, because I am on a budget, I want a degree of flexibility in the possible arrangements of my terrain so I don't have to have too many boards (plus the wife won't let me store that many). All of which led me to the idea to make my own.

I've decided to post the process here because I am interested in feedback from the community as the terrain develops. This is to be a labor of love, and I won't be rushing it. So as I proceed, and post progress, please do feel free to offer suggestions and commentary. I have experience in model and diorama building thanks to my profession, so I hope to leverage that toward a higher quality product.

After a significant amount of research and tutorials on techniques used in most major gaming communities, I landed on starting with 1 1/2" insulation foam. Very easy to manipulate, very light, and cheap. And my local lumber yard delivers it.

That decided, I moved on to figuring out what I wanted this terrain to be. I still haven't decided on a biome, but I know I want water features. And I know I eventually want some kind of urban space on the map, to provide cover and hidden unit situations without always needing to have trees (again flexibility, sometimes an urban map, sometimes not). That said, I haven't decided what those LOS blockers will be yet, per se.

Hopping into my favorite 3d design program, I laid out a number of board sections that could be swapped about, with built in water features that match up depending on the layout I'm feeling at the moment.


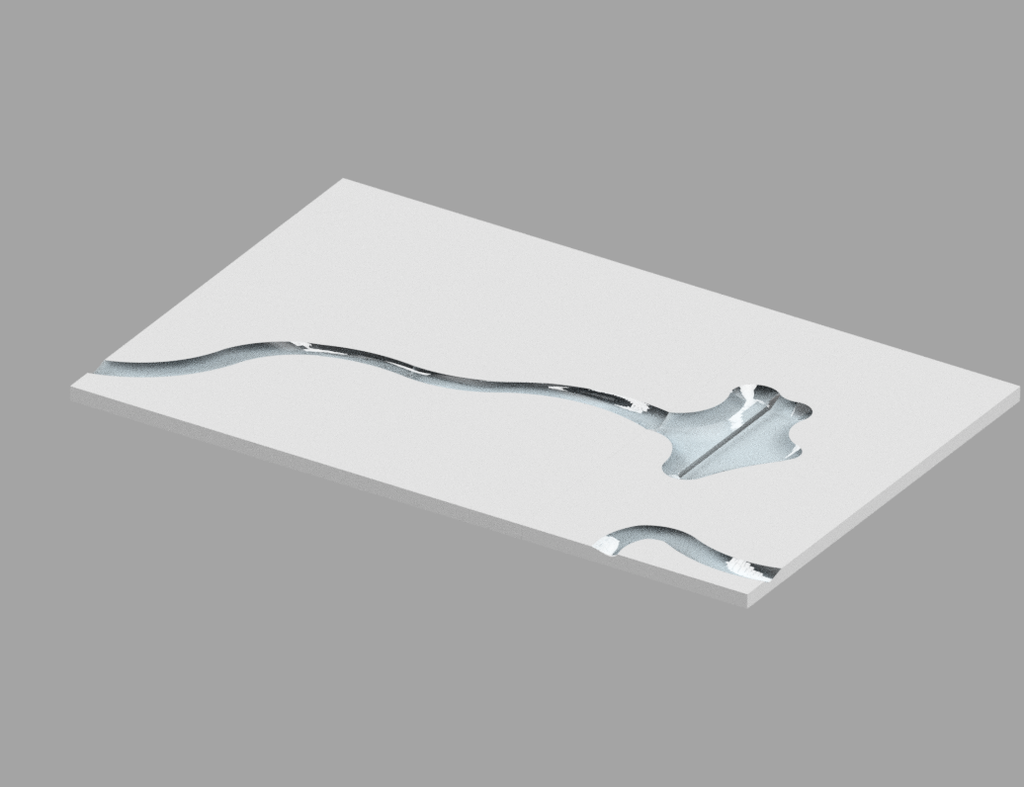
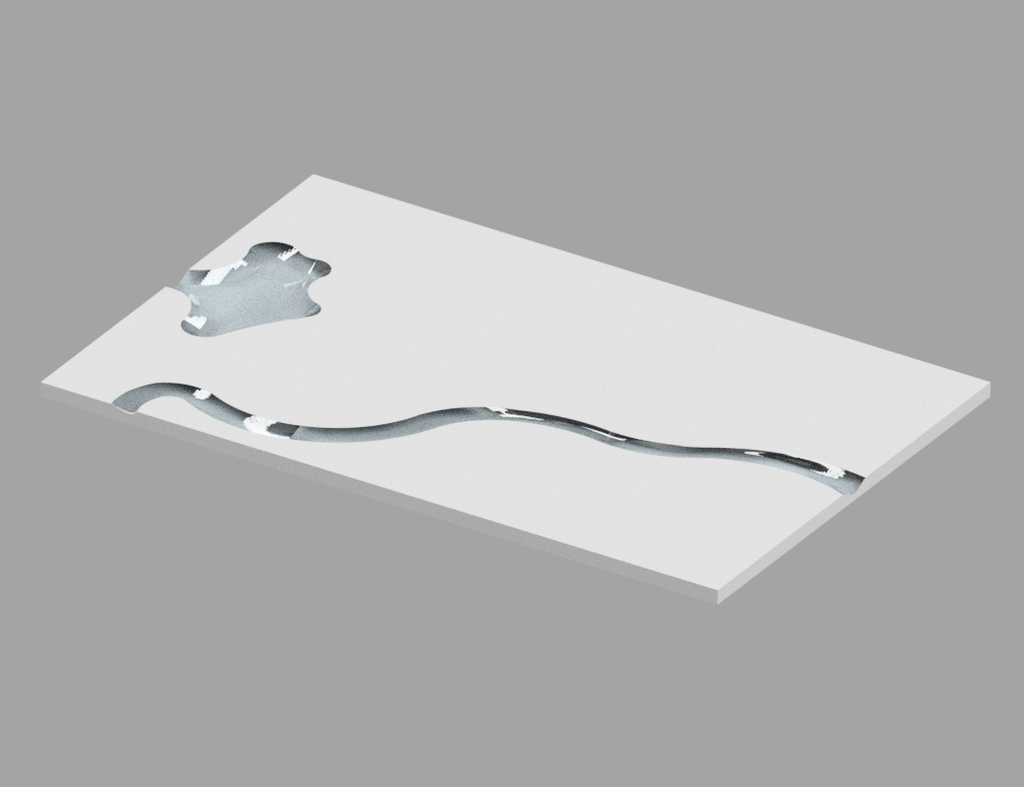
I will also be treating one 2'x4' panel with no water feature, to have a large open space available (maybe for a mountainous area).

Next step is to layout this topography on the panels that I'll be cutting in a couple of minutes.

Thanks all. Stayed tuned, and please do feel free to comment.

john blackwell

  • Lieutenant
  • *
  • Posts: 1123
  • putting on a happy face
Re: 3d Terrain Project
« Reply #1 on: 09 May 2017, 18:53:13 »
I'm looking forward to seeing how this unfolds.

Good luck,
JB
One who puts on his armor should not boast like one who takes it off
Pro pacis par vox excellens

NeonKnight

  • Freelance Writer
  • Major
  • *
  • Posts: 6345
  • Cause Them My Initials!
Re: 3d Terrain Project
« Reply #2 on: 09 May 2017, 21:04:02 »
Looks good.

What are you using?

Reason I ask, is there are 24 x 24 sheets of Pink Foam insulation at Homedepot. I used this to make a demo board, though I am thinking of trying to make a 4x6 table's worth later this year

http://bg.battletech.com/forums/index.php?topic=55483.0
AGENT #575, Vancouver Canada

boeduur

  • Recruit
  • *
  • Posts: 18
  • Death before dishonor.
Re: 3d Terrain Project
« Reply #3 on: 09 May 2017, 22:12:57 »
@NeonKnight

I saw those, and considered using them. But I didn't like that they only came in 1/2" and 1". Not bad for elevations like hills and mountains, but for my base layer of terrain I wanted something I could dig deeper into for the water features.

So I went with 1 1/2" Green Board. It's a polystyrene product for insulating walls. It's an extremely dense foam, which is good because you can be more forceful shaping it, and don't have to worry about there being any gaps or pockets in the ply layers of the board. Lowes and HomeDepot both sel this product.

One thing I forgot when I ordered it was that it has slits along the full 4x8 sheet for catching wall jacks. But I just filled them with joint compound, and then sanded them with 220 grit sand paper. Even that took some of the original smooth finish of the material off, though, so I wouldn't recommend that process if you want a smooth surface. Carefully lain caulk would be preferable if you do; but, caulk isn't shapable, so you'd have to slice it flush with a blade the bead dried.


This was my next step, I cut down the 4x8 into 4 pieces of 2'x4'. Then I marked out the river paths with a China marker because it isneasily painted over (versus a sharpie), and more visible than pencil on the material. Then I light dremeled the edges of the paths so I had a ready guide for digging in with my rasp and sureform. The rasp does great in removing large amount of material, and I found the sureform was good for finishing the edges and smoothing the roughness of the torn foam.

Three more to shape:


Next step will be to lay in a urethane to smooth the river beds, and ready them for sand. Urethaning the beds will also protect them from the treatment I plan to do to rough up the surround terrain, which is lightly spraying the pieces with spray paint. Polystyrene melts when sprayed, and I think it will add a nice texture to my ground layer.

Still can't decide if this is grass, dirt, rock, what have you though. Thoughts? Bearing in mind this is being built for flexibility and universality.

Thanks

NeonKnight

  • Freelance Writer
  • Major
  • *
  • Posts: 6345
  • Cause Them My Initials!
Re: 3d Terrain Project
« Reply #4 on: 10 May 2017, 00:30:11 »
I'll be honest. Grass looks nice. Dirt and rock easier to deal with and doesn't 'shed'

I've done both. Dirt....soooo much easier, less mess, and, ultimately...Cheaper.

http://bg.battletech.com/forums/index.php?topic=49963.msg1153229#msg1153229
AGENT #575, Vancouver Canada

cybersmily

  • Recruit
  • *
  • Posts: 2
Re: 3d Terrain Project
« Reply #5 on: 10 May 2017, 20:22:28 »
If you are looking for some inspiration/tips check out TerranScapes videos, https://www.youtube.com/user/Terranscapes/featured and his patreon site, https://www.patreon.com/TerranScapes. He does some amazing stuff. On the patreon site he has some free articles on building boards with features like you're going for. Also take a look at Terrain Tutor, https://www.youtube.com/channel/UCx_aro8CTHw7ZD5H661hC6Q, another guy with lots of tips, tricks, and lessons.

boeduur

  • Recruit
  • *
  • Posts: 18
  • Death before dishonor.
Re: 3d Terrain Project
« Reply #6 on: 11 May 2017, 10:16:14 »
@cybersmily, thanks for those suggestions! Great videos on there for development. As a result of the inspiration I found there, I've decided I am going to do a combination dirt/grass map.

Progress continues on the boards.


Got a bit impatient with the rasp and sureform, so I started to use a grinder with a brush wheel to rough in the shapes, and then refined with those other tools. Worked rather well, but I had to be a bit careful to not accidentally dig too deep. The angel was tricky to manage, as well, but found a comfortable groove quickly.

Now I am urethaning the cut grooves to make a smooth surface in the valleys. A little concerned the urethane may be too thin, and I might switch to epoxy depending on how this one comes out. But I like that urethane will flex a little with the foam, which will help avoid cracking.


I've also tested my spray-paint texturing on one of the boards. I think I am going to have to be a bit more heavy handed with the spray than I'd originally intended. The light spray coat I did on my first pass largely just opened up fissures along the grain of the foam, which looks kind of sad. If they were a random pattern I wouldn't mind so much, but right now they are very directional, horizontal across the sheet. Will try more soon.

Thanks all, stay tuned.

shadhawk

  • Catalyst Demo Team
  • Captain
  • *
  • Posts: 1853
Re: 3d Terrain Project
« Reply #7 on: 13 May 2017, 17:59:40 »
you may want to go to a house paint as a base coat or even a finish coat. The spray paint will eat in to the foam. A good latex paint will work very well. also the cost a gal of latex vs the many spray cans  is a big difference.

this is all 1" foam and they are cut to 2' x 4'. I also set them up so I can move things around to change things up a bit.

a few pics of something I did a few years back. and I still use it.
« Last Edit: 13 May 2017, 18:01:27 by shadhawk »

Ratboy

  • Catalyst Demo Team
  • Master Sergeant
  • *
  • Posts: 362
Re: 3d Terrain Project
« Reply #8 on: 13 May 2017, 21:54:06 »
Instead of using spray paint, use a heat gun. Much easier to control and no residue. Ventilation is a must.

Jim Williamson - CDT Agent #206
NJ, USA

boeduur

  • Recruit
  • *
  • Posts: 18
  • Death before dishonor.
Re: 3d Terrain Project
« Reply #9 on: 14 May 2017, 14:49:45 »
@shadhawk my goal was actually to have the spray eat the foam. I was hoping it would wind up being a more organic way of texturing and contouring  the surface than me going at it with a rasp. Sadly, it seemed to be an unreliable method, with varying degrees of results.

@ratboy yeah, that was my final solution after discovering the spray paint won't work. Not don't with the contouring yet, but I'll post the results of that soon. Thanks for the tip, great minds think alike?  ;)

shadhawk

  • Catalyst Demo Team
  • Captain
  • *
  • Posts: 1853
Re: 3d Terrain Project
« Reply #10 on: 15 May 2017, 12:11:20 »
@shadhawk my goal was actually to have the spray eat the foam. I was hoping it would wind up being a more organic way of texturing and contouring  the surface than me going at it with a rasp. Sadly, it seemed to be an unreliable method, with varying degrees of results.

OK it will work. what type of foam board are you using?
If it is the white cell of Pink/Purple house type?
the white will melt very easy. a brush with some nail polish remover will do the trick. us a very light touch and work it until you get the level you want.
the Pink/Purple house foam has a harder core and will need a bit more solvent but once more go light until you get what you are looking for.
Spray paint will hit and melt the foam in spots due to the thinner mix as it hits the foam. some way to heavy and others not at all due to the fact of how little of the thinner hits the foam. and the foam will meld at different rates due to how it was mixed.

boeduur

  • Recruit
  • *
  • Posts: 18
  • Death before dishonor.
Re: 3d Terrain Project
« Reply #11 on: 15 May 2017, 12:17:47 »
I'm using the green house insulation. Thinner is a good idea, but may try to use the heat gun first.

Initially I wanted the spray to do both contour and texture. But, now I'm thinking of doing contour with the gun, and using Masonite dust to create the dirt texture, and flicking for the grass. Touched up with some color afterward.

shadhawk

  • Catalyst Demo Team
  • Captain
  • *
  • Posts: 1853
Re: 3d Terrain Project
« Reply #12 on: 15 May 2017, 12:30:00 »
I'm using the green house insulation. Thinner is a good idea, but may try to use the heat gun first.

Initially I wanted the spray to do both contour and texture. But, now I'm thinking of doing contour with the gun, and using Masonite dust to create the dirt texture, and flicking for the grass. Touched up with some color afterward.

OK that is a hard foam and will take a bit more to work.

like the thinners idea take care with the heat gun. once the foam gets hot just like thinner it will melt fast.

you also can use a hammer or other "force" item to work the foam. I have "hammered" some lines in to terrain I have made. You know just looking for a small depressed area here and there kind of thing. and as with all things doing this type of work start with a light touch and go heavy as needed.

boeduur

  • Recruit
  • *
  • Posts: 18
  • Death before dishonor.
Re: 3d Terrain Project
« Reply #13 on: 15 May 2017, 17:29:30 »
Hey all,

Another update. Heat gun worked well for the contouring of the foam. My lower profile peaks and valleys are now in. Especially along the lake area, where I think there will be some sand dunes.

And, texturing has begun!


Running a scene shop, I have a lot of these materials at hand, and they normal go straight into the trash. Thankfully, I can recycle them! With a little thinned down white glue (by which I actually mean a lot) these should hold nicely, and look great.

I began with the sand because I'd like for the dirt to overlap the sand a little where they meet. But, I did do some texture-sampling of the dirt off in the corner, and a test of that overlap with the sand. Once these spots are dry, I'll flip the boards over and brush off any excess. Then I'll have to go back through and recoat spots that are too thin. It will likely be a two or three-pass process.

Once the texturing materials are visually to my satisfaction and secure, and before the grass, I'll start a paint pass using a paint sprayer (p50 gun). A water-thinned medium brown over the dirt will unify the colors, and a urethane sealer on the sand will preserve its visual under eventual coats of blue-tinted urethane.

Once those first paint passes dry, I will layer multiple tones of brown over the dirt to make it more realistic (also with a paint sprayer), and build up some white caps of "waves" in the layers of urethane.

That said, I don't plan to build the water up to a level height with the dirt, because I want level differentiation (-1 and -2 terrain). What do you think, does that work or should I ask my players to suspend disbelief a little and layer the water level with the dirt?

Thanks all, stay tuned.

Edited for clarity, and added a question
« Last Edit: 15 May 2017, 17:40:51 by boeduur »

I am Belch II

  • Lieutenant Colonel
  • *
  • Posts: 10146
  • It's a gator with a nuke, whats the problem.
Re: 3d Terrain Project
« Reply #14 on: 15 May 2017, 20:05:25 »
That is so beyond awesome. Nice Job.
Walking the fine line between sarcasm and being a smart-ass

boeduur

  • Recruit
  • *
  • Posts: 18
  • Death before dishonor.
Re: 3d Terrain Project
« Reply #15 on: 22 May 2017, 12:40:48 »
Hey all,

Didn't want you to think I'd stopped work, or forgotten about ya'll.

Texturing progress has been made!


What you see here is multiple iterations of layering on glue, texture, dry time, glue, texture, dry time, etc., to get full coverage of the material across the foam pieces.

Once I confirm this afternoon that I have finally gotten full coverage, I'll be starting the coloring process to unify the "dirt" materials. I will also be lightening up the color of the sand, because the gluing process tinted it a dark and unrealistic color. As I mentioned a couple posts ago, this will consist of spraying watered down paint, in layers of color to give it depth and realism, across all of the material.

Thanks all, more to come.

Valkerie

  • Captain
  • *
  • Posts: 2522
  • Gravity always wins.
Re: 3d Terrain Project
« Reply #16 on: 22 May 2017, 21:47:17 »
Wow, nice work.  Love seeing the progression.  May it continue to go well  O0
There is no avoiding war; it can only be postponed to the advantage of others.   -Machiavelli

Greetings, Mechwarrior!  You have been recruited by the Star League to defend the frontier against...Oops, wrong universe.  -unknown SLDF Recruiter

Because overkill is underrated my friend.  -John "Hannibal" Smith

Unit/Scheme of the Month Master Index

boeduur

  • Recruit
  • *
  • Posts: 18
  • Death before dishonor.
Re: 3d Terrain Project
« Reply #17 on: 27 May 2017, 09:35:07 »
Hey all,

More progress made on the board. Coloring the dirt and sand is complete!


The variation in the dirt colors in that picture is weird because they don't look like that in real life. But I'm also not too worried about in because I'll be leaving the areas with the darker, richer, brown as dirt, and covering the rest with flocking for grass as you can see from my rendering below.


Next step is to prep the sand surface for water effects, which I am doing by laying on a coat of spar urethane.


Once this cures, I'll be taking some time to paint some of the clumpy areas as rocks along the shore line.

Then I'll be layering clear silicone caulk, with blue pigment tint in it to give it the appearance of water with depth. The deepest areas will be a pure dark blue (to represent -2 levels), and from there it'll build to a light blue as I mix in white pigment to -1 and shoreline. The caulk is an excellent medium for this because it can be shaped when I want to for waves, but will also self-level to a flat surface when I don't.

More to come on that next week.

Thanks all.
« Last Edit: 27 May 2017, 09:42:51 by boeduur »

shadhawk

  • Catalyst Demo Team
  • Captain
  • *
  • Posts: 1853
Re: 3d Terrain Project
« Reply #18 on: 27 May 2017, 19:52:55 »
it is looking very good  8)

john blackwell

  • Lieutenant
  • *
  • Posts: 1123
  • putting on a happy face
Re: 3d Terrain Project
« Reply #19 on: 27 May 2017, 20:06:03 »
Looks great!

One question: Did I read that you're using color to delineate between depth 0, depth 1, and depth 2? If I didn't read that correctly, what is your plan?

JB
One who puts on his armor should not boast like one who takes it off
Pro pacis par vox excellens

boeduur

  • Recruit
  • *
  • Posts: 18
  • Death before dishonor.
Re: 3d Terrain Project
« Reply #20 on: 27 May 2017, 21:08:33 »
@john
Yep, I am doing a deep blue for -2, and a lighter blue for -1.

boeduur

  • Recruit
  • *
  • Posts: 18
  • Death before dishonor.
Re: 3d Terrain Project
« Reply #21 on: 30 May 2017, 14:55:12 »
Afternoon all,

Made some good progress today,  so I figured I'd post up an update.

Started the day by painting the rocks in and along the river with a base coat of brown-grey. Here's a couple of examples.


And a rough look across the basin.


Next, I washed them with the rock color mixed with some black and heavily watered down (lots of nooks and crannies I had to be sure it flowed into). Once that dried, I dry brushed that color mixed with white for highlights. Sadly, I don't have a picture of the results because I got too excited and jumped to the next step first...


This is the first layer of deep water treatment. It is a navy blue tint mixed into semi-gloss polyurethane. The next layer will be touch-up really before I lay in the first coat of clear caulk, which will create a sense of depth between the layers of blue I'll build up.

As you can see below, I wasn't avoiding covering my nicely painted rocks with this tint. Those rocks will still be visible under the water thanks to using the poly, and I think it'll help give this river a sense of depth it won't actually have to be seeing them underneath.


Looking really far ahead, does anyone have suggestions on laying in flocking over a textured surface? I am starting to think I'll have to spray it with watered down glue, and then dust the flocking over the board. But if there's a better way, I'd love to know... because that process will take FOREVER.

Thanks all

Terminax

  • Lieutenant
  • *
  • Posts: 1185
  • Never despair. Never surrender.
Re: 3d Terrain Project
« Reply #22 on: 31 May 2017, 11:32:42 »
I'd just use a roller with watered down tacky glue. Let it dry enough to return to tackiness then flock. Mind you, what's the point of texturing then flocking in my mind, usually the one replaces the other.

boeduur

  • Recruit
  • *
  • Posts: 18
  • Death before dishonor.
Re: 3d Terrain Project
« Reply #23 on: 31 May 2017, 14:53:44 »
I wound up using watered down white glue in a little spritzer bottle (1glue to 3 water).

@Terminax
Primarily because this looks more realistic to me than most flocking jobs on other boards, especially at BT scale.


Like my own back yard, I like that I can see a lot of dirt in and through the grass. Rarely do you see a field that is solid green grass.

Thanks all!
« Last Edit: 31 May 2017, 14:55:26 by boeduur »

SeeM

  • Master Sergeant
  • *
  • Posts: 342
Re: 3d Terrain Project
« Reply #24 on: 28 July 2017, 08:14:27 »
Are you able to see any picture? All I get is "please update you account" message.
(+)

boeduur

  • Recruit
  • *
  • Posts: 18
  • Death before dishonor.
Re: 3d Terrain Project
« Reply #25 on: 28 July 2017, 08:19:58 »
 Uh oh... wonder if I'm going to have to find another image host. Photobucket wants me to spend money now.

In other news, I apologize for the radio silence, all. I work at a school, and have been using the shop there to make my terrain, but we're on summer break at the moment. So, I'll be getting back into the groove in a couple weeks.

I have neither given up, nor died  ;D


Register