Author Topic: . . . and so it begins . . . (update: 3/22)  (Read 12092 times)

john blackwell

  • Lieutenant
  • *
  • Posts: 1123
  • putting on a happy face
. . . and so it begins . . . (update: 3/22)
« on: 08 March 2012, 21:27:02 »
Water tiles . . . check                                                                             Shoreline . . . check


Swamp tiles . . . check                                                                           Sand tiles . . . check


Heavy woods & rough ground . . . check                                                  Light woods . . . check


Industry & destroyed units . . . progressing


60-hex stencile . . . check


time to flock 3272 hexes of open terrain . . . uuh . . .


. . . and so it begins . . .
JB
« Last Edit: 22 March 2012, 19:58:55 by john blackwell »
One who puts on his armor should not boast like one who takes it off
Pro pacis par vox excellens

House Davie Merc

  • Lieutenant
  • *
  • Posts: 1261
Re: . . . and so it begins . . .
« Reply #1 on: 09 March 2012, 03:50:47 »
I'm not into the tiles like a lot of people , but I REALLY like the look of the
shoreline tiles you made .

Those are gonna look really good connected .

The dark green for heavy woods and light green for light is pretty much what I've
used for my terrain .

With a 4 day weekend coming up for me I need to get something done to .

As someone who's patience has been tested by making an accurate stencile I can
appreciate the amount of work that went into making yours .

Papabees

  • Lieutenant
  • *
  • Posts: 952
Re: . . . and so it begins . . .
« Reply #2 on: 09 March 2012, 08:28:42 »
buy a sponge paint roller. The 4" kind. you will thank me later.

ApokalypseTest

  • Catalyst Demo Team
  • Sergeant
  • *
  • Posts: 138
Re: . . . and so it begins . . .
« Reply #3 on: 12 March 2012, 11:29:21 »
How did you make the stencil?

john blackwell

  • Lieutenant
  • *
  • Posts: 1123
  • putting on a happy face
Re: . . . and so it begins . . .
« Reply #4 on: 12 March 2012, 12:10:08 »
How did you make the stencil?

60-hex stencile . . . check


tag board (not thick enough and may warrant another shot at it) and 3 exacto blades . . .

. . . and several hours of time.  I would love to know how others would tackle this.  Anyone?

Please?
JB

One who puts on his armor should not boast like one who takes it off
Pro pacis par vox excellens

Propnut

  • Corporal
  • *
  • Posts: 97
Re: . . . and so it begins . . .
« Reply #5 on: 14 March 2012, 17:05:53 »
Um.....with a CNC cutter? :D

I know, not fair...... O:-)

Jeffrey

  • Master Sergeant
  • *
  • Posts: 337
  • play with battletech pandemonium tidewaterchapter
    • battletechpandemonium.tidewaterchapter
Re: . . . and so it begins . . .
« Reply #6 on: 14 March 2012, 18:25:47 »
love the water pieces
check out Battletech pandemonium on facebook  (Virginia)


                                                                                                                                                                               no kidding,there I was,surrounded,and was I scared, darn right I was scared,scared that one of them would get away!!!                                                                          Hampton,Virginia

john blackwell

  • Lieutenant
  • *
  • Posts: 1123
  • putting on a happy face
Re: . . . and so it begins . . .
« Reply #7 on: 14 March 2012, 19:11:40 »
Um.....with a CNC cutter? :D

I know, not fair...... O:-)

Yeah, if I were still in GR I would have taken less time to swing by your shop and work something out there . . . oh well.  I took the low (very low) tech approach.

Well, y'all know what I'll be up to for the next . . . oh . . . *insert appropriate period of time here*.

love the water pieces

Thank you, Jeffrey.


JB
One who puts on his armor should not boast like one who takes it off
Pro pacis par vox excellens

markhall

  • Lieutenant
  • *
  • Posts: 1435
  • "The Button's Stuck!"
Re: . . . and so it begins . . .
« Reply #8 on: 15 March 2012, 10:58:14 »
Jebus that's a hex of work.

Good luck with it all John.

ExtremeBloodAspUser

  • Master Sergeant
  • *
  • Posts: 307
  • "The tapeworm in my wrist tells me to burn things"
Re: . . . and so it begins . . .
« Reply #9 on: 16 March 2012, 14:27:59 »
I would get so lost in a work load like that, but man that would be a great roller coaster ride while it lasted. #P
"I crush little childrens dreams everyday...Ralph your not a kangaroo...Ralph your also not a trophy....."

Maddog3025

  • Sergeant
  • *
  • Posts: 118
Re: . . . and so it begins . . .
« Reply #10 on: 17 March 2012, 11:33:54 »
I don't care for the Heroscape tiles or hexes in general, but your versions are really exceptional.  Well done!

john blackwell

  • Lieutenant
  • *
  • Posts: 1123
  • putting on a happy face
Re: . . . and so it begins . . . (update: 3/22)
« Reply #11 on: 22 March 2012, 20:07:34 »
I thought I would pause and remind myself if all this work is worth it . . . anyone else been there?

comparison: original tiles next to new open ground (after all, even open ground has texture - none of it would slow down a mech)


Add various terrain elements (two-tree = heavy, one-tree = light, log jam rough ground, solo trees are simply there for asthetics)


Add all other terrain elements (swamp wet & dry, sand, shoreline, open water: depth 0, 1, & 2)


Those shoreline stones pop out more than I expected - oh well, can't (won't) go back and fix that any more


Only about 10% of the way through all the terrain tiles . . . yeah . . . *long pause* it will be worth it.

Back to work,
JB

EDIT: grammar
« Last Edit: 22 March 2012, 20:13:09 by john blackwell »
One who puts on his armor should not boast like one who takes it off
Pro pacis par vox excellens

shadhawk

  • Catalyst Demo Team
  • Captain
  • *
  • Posts: 1875
Re: . . . and so it begins . . . (update: 3/22)
« Reply #12 on: 22 March 2012, 20:17:42 »
when you finish you will say yes ... it's just the  finished part O0

ApokalypseTest

  • Catalyst Demo Team
  • Sergeant
  • *
  • Posts: 138
Re: . . . and so it begins . . . (update: 3/22)
« Reply #13 on: 23 March 2012, 07:47:43 »
VERRRRRY Nice - how did you make the Shrubs on the hexes? I mean the little green sprinkles

And what glue do you use?

Whitar

  • Master Sergeant
  • *
  • Posts: 334
Re: . . . and so it begins . . . (update: 3/22)
« Reply #14 on: 23 March 2012, 11:25:28 »
I love it. Nice buildings and trees too.
I share your thoughts about the shoreline stones  ;)

john blackwell

  • Lieutenant
  • *
  • Posts: 1123
  • putting on a happy face
Re: . . . and so it begins . . . (update: 3/22)
« Reply #15 on: 23 March 2012, 15:47:43 »
I love it. Nice buildings and trees too.

VERRRRRY Nice - how did you make the Shrubs on the hexes? I mean the little green sprinkles

Thank you both.

The sprinkles are from Woodland Scenic - from a local model RR shop.  I think they're the fine shrubs - NOT coarse.  Each piece is millimeters in size.

side note: the flocking is Woodland Scenic Fine Turf: burnt grass and accented with Fine Turf: yellow grass.

And what glue do you use?

I use regular elmers glue mixed with water.  I'm guessing it's about 3:1 water to glue and applied with an eyedropper.

I'll photograph a sequence the next time I do this.

JB
One who puts on his armor should not boast like one who takes it off
Pro pacis par vox excellens

Papabees

  • Lieutenant
  • *
  • Posts: 952
Re: . . . and so it begins . . . (update: 3/22)
« Reply #16 on: 24 March 2012, 14:03:11 »
What are you using to adhere the regular flock?

john blackwell

  • Lieutenant
  • *
  • Posts: 1123
  • putting on a happy face
Re: . . . and so it begins . . . (update: 3/22)
« Reply #17 on: 24 March 2012, 16:12:14 »
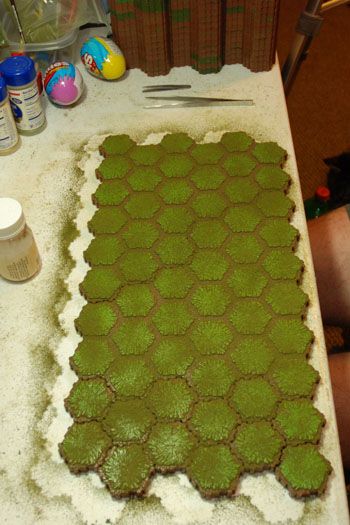
I begin with a 60-hex panel.  This was the original shape of the stencil.  I have begun working without it.  It was an unnecessary element in this.

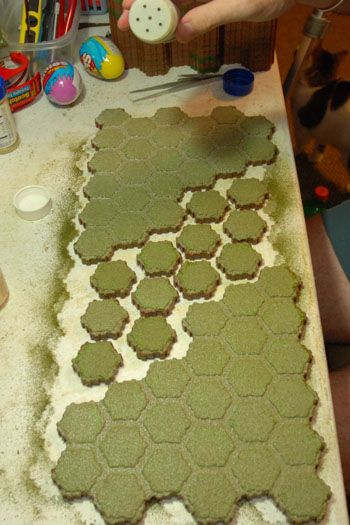
This panel is gradually coated with cheap hair spray and burnt-grass flocking.  This will help hold the original flocking to the hexes for the future glue/water.  Without this, the glue/water will bead on the plastic surface and not cover the tile evenly (learned this the hard way).


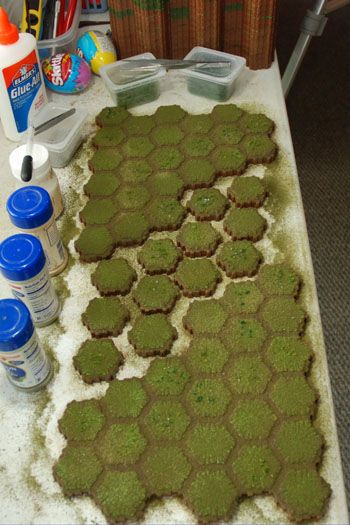
I break the panel up into its respective tiles.                  Using an eye dropper, apply white glue/water to each tile


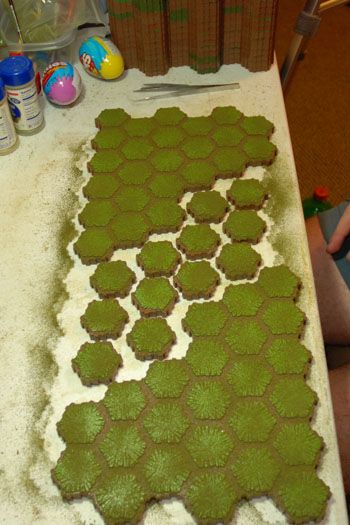
until each tile is saturated.                                           Then I apply another heavy layer of burnt grass flocking . . . 


. . . then yellow grass. . .                                              . . . then dirt brown between the hexes.


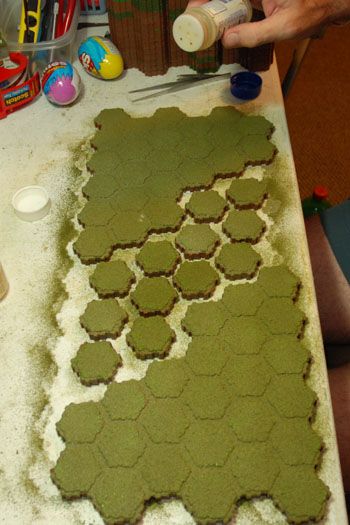
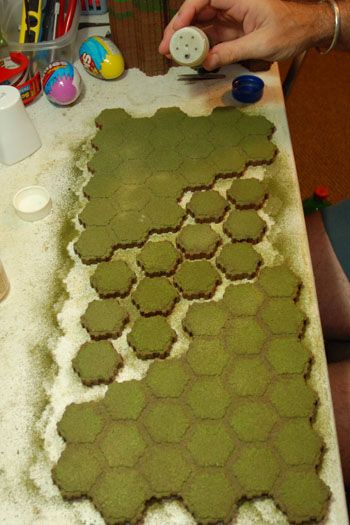
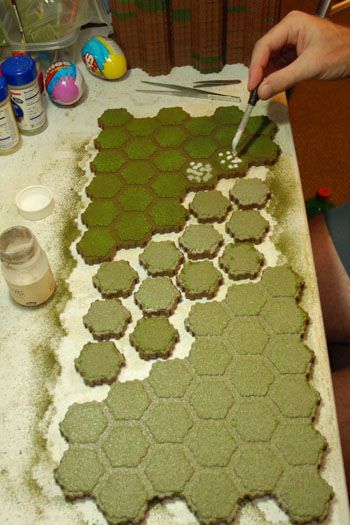
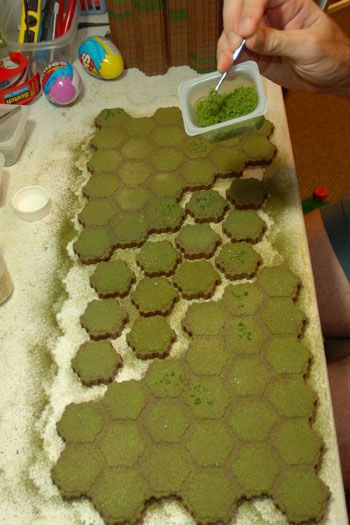
Add kitty-litter rocks (very sparingly) . . .                       . . . dark fine shrubs (1 hex per 6) . . .             


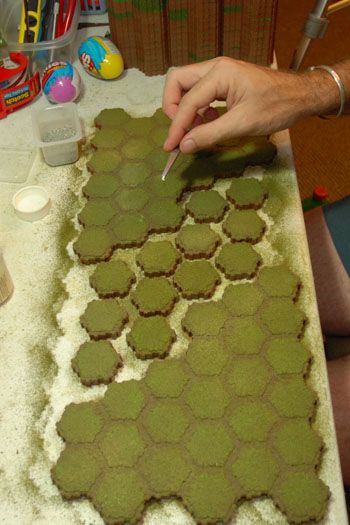
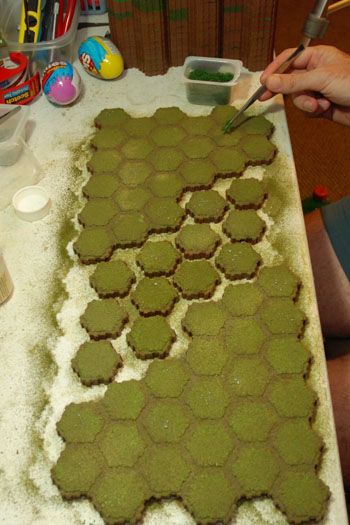
 . . . lighter fine shrubs (2 hexes per 6).                         I pressed them carefully into the wet hex . . .


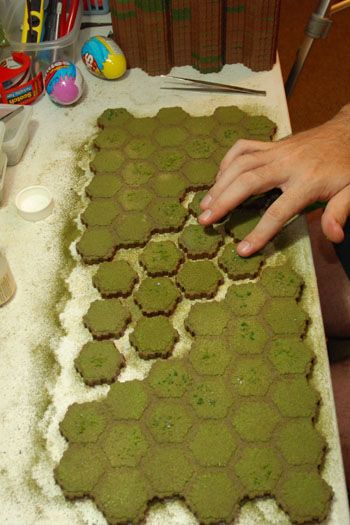
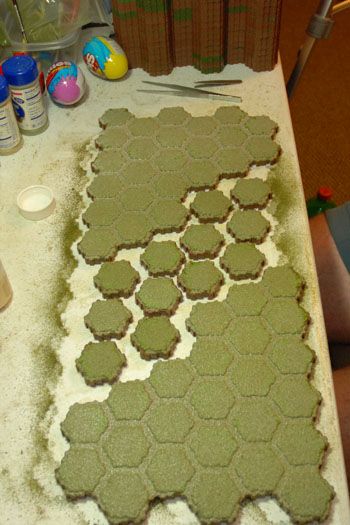
. . . reapplied glue/water to the shrubed tiles . . .            . . . and let it dry over-night. 


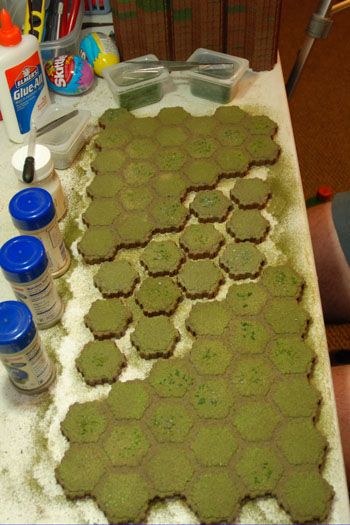
Next morning, 60 finished tiles. 


It's a bit of a process, but easy to replicate and repeat.  I have found that working with these requires a bit more care, but I think the final terrain will be worth it.


Happy hunting,
JB

EDIT: layout
« Last Edit: 30 March 2012, 21:17:57 by john blackwell »
One who puts on his armor should not boast like one who takes it off
Pro pacis par vox excellens

Whitar

  • Master Sergeant
  • *
  • Posts: 334
Re: . . . and so it begins . . . (update: 3/22)
« Reply #18 on: 25 March 2012, 08:01:08 »
I want to add, you achieved a fantastic swamp water effect  O0

ApokalypseTest

  • Catalyst Demo Team
  • Sergeant
  • *
  • Posts: 138
Re: . . . and so it begins . . . (update: 3/22)
« Reply #19 on: 25 March 2012, 10:07:13 »
Very interesting - you obviously use a very different method than I do.

I first sanded the tiles with a fine sand paper. Then applied a basecout with an acrylic pulyurethane primer (black), than I drybrushed the raised part of the hexes will brown and green wallpaint in a random pattern. AFter that I applied a coat of wood-hglue (basically like elmers) thinned with water, 3 parts water, 1 part glue and then some drops of dish washing detergent (that further reduces the beading effect). Finally I flock them with a mix of summer and fall model railroad grass flock.

All this left the spaces between the hexes untouched  to make sure that the stacking later would not be affected.

Finally I spray the flocked surface with several coats of hairspray to fixate the grass flock.

After seeing what you did, I will look for something to add shrub in the same way you did and also add some sand to the flocking process.


Alex Keller

  • Captain
  • *
  • Posts: 2358
Re: . . . and so it begins . . . (update: 3/22)
« Reply #20 on: 25 March 2012, 10:40:19 »
Really well done.  I'm not a fan of the Heroscape terrain, but you make it look really good. 

Papabees

  • Lieutenant
  • *
  • Posts: 952
Re: . . . and so it begins . . . (update: 3/22)
« Reply #21 on: 27 March 2012, 16:06:16 »
Interesting to hear different approaches. I used elmers straight from the bottle and used a foam roller to paint it on the raised tile faces and then buried them in flock. 

ApokalypseTest

  • Catalyst Demo Team
  • Sergeant
  • *
  • Posts: 138
Re: . . . and so it begins . . . (update: 3/22)
« Reply #22 on: 27 March 2012, 18:13:48 »
didnt you get too much glue between the raised parts?

Crimson Dynamo

  • Lieutenant
  • *
  • Posts: 1188
  • Opening hearts, minds, and throats since 2807
Re: . . . and so it begins . . . (update: 3/22)
« Reply #23 on: 30 March 2012, 18:09:07 »
John, you're as certifiably awesome as you are crazy. Very inspirational work in this thread!
"Well, I do, Marcus, and rule number one of the MAC has always been that the man with the plan leads. If we get shot up, I'm the first one to get my ticket punched. There are no flags in the MAC."
"And there never will be," Barton said, nodding his head in agreement.

"You guys are facing a freaking Shadow Division! These guys have strict policies against playing fair!"

"I don’t care. Kill them. I planned the defense so I know it will work. If they claim otherwise, they’re cowards. Any step back is a betrayal of me, and saying they don’t have enough men is just an excuse for incompetence and disloyalty. Tell the Krypteia to do it if you’re too soft but get it done." -Emperor Stefan Ukris Amaris I

john blackwell

  • Lieutenant
  • *
  • Posts: 1123
  • putting on a happy face
Re: . . . and so it begins . . . (update: 3/22)
« Reply #24 on: 30 March 2012, 21:22:08 »
didnt you get too much glue between the raised parts?

The glue/water covers the entire tile.  Once it dries, it's not sticky at all but allows for flocking to adhere between the hexes.

John, you're as certifiably awesome as you are crazy.
  ^-^
Very inspirational work in this thread!

Thank you very much

JB
One who puts on his armor should not boast like one who takes it off
Pro pacis par vox excellens

[1st RDR] Surtr

  • Recruit
  • *
  • Posts: 8
Re: . . . and so it begins . . . (update: 3/22)
« Reply #25 on: 05 March 2014, 09:58:19 »
This is beautiful. I am currently torn between more standard terrain or getting into HS tiles. This helps the case for heroscape however.

john blackwell

  • Lieutenant
  • *
  • Posts: 1123
  • putting on a happy face
Re: . . . and so it begins . . . (update: 3/22)
« Reply #26 on: 05 March 2014, 12:29:46 »
Welcome to the boards, and thank you.  If I may, here are other links to other terrain elements I have built that work with Heroscape tiles:

Terrain: (where I first developed the terrain tile that I use for many of my ground applications)
Part I: http://bg.battletech.com/forums/index.php/topic,7543.0.html
Part II: http://bg.battletech.com/forums/index.php/topic,14983.0.html

Keeping in on land, I ventured off to other elements:
Bridge part I: http://bg.battletech.com/forums/index.php/topic,6197.0.html
Bridge part II: http://bg.battletech.com/forums/index.php/topic,28894.0.html

I worked on different ground items like buildings, hedges, road tiles, and etc:
more place-able stuff: http://bg.battletech.com/forums/index.php/topic,28896.0.html

I took the Heroscape road & bridge set (2 of them) and converted them:
Spaceport & tarmac: http://bg.battletech.com/forums/index.php/topic,28897.0.html

I went offshore and began working on swamp tiles:
Swamp part I: http://bg.battletech.com/forums/index.php/topic,6724.0.html
Swamp part II: http://bg.battletech.com/forums/index.php/topic,14791.0.html
Swamp part III: http://bg.battletech.com/forums/index.php/topic,31524.0.html

I also worked over my water tiles:
Tile: (terrain part II above)
Water: http://bg.battletech.com/forums/index.php/topic,30329.0.html

I'm happy to share these and pass around the ideas.  Many of them originate with others.  I've simply made them work for me.

I hope you find a system that works for you.  Please post as you develop it.

Happy hunting,
JB
One who puts on his armor should not boast like one who takes it off
Pro pacis par vox excellens

Remove

  • Master Sergeant
  • *
  • Posts: 319
Re: . . . and so it begins . . . (update: 3/22)
« Reply #27 on: 05 March 2014, 22:31:46 »
You continue to inspire and motivate all while setting the bar higher!  O0